Makeover Monday: Basic Tools

I’m going to walk you through how to do a quick edit using the tools provided in Lightroom 4. (LR4)

Let’s start with our SOOC (straight out of camera) image.

IMG_0061-3

The first thing we’re going to do is use our crop tool.

Located on the top right corner.

It looks like a grid.

Screen Shot 2014-10-10 at 4.25.24 PM

We’re going to hold down the mouse & move it to the right, to get the image to rotate.

Screen Shot 2014-10-10 at 4.20.50 PM

SIDEBAR:

See the small photo on the top left of my screen shot.

That’s the navigate window.

You can hoover over a choice (like convert to B&W) & it will show you what it would look like.

In this case it’s showing what our final rotated image would look like, once we let go of our mouse.

You can see in my history (located to the left of the screen shot, the last grey block)

that I’ve rotated it a few times to get the look I want

Screen Shot 2014-10-10 at 4.20.53 PM

Now, if I had any red eyes, I would correct it here.

Using the circle with the dot in the middle.

Screen Shot 2014-10-10 at 4.37.04 PM

You can either click on the image itself to zoom in.

Screen Shot 2014-10-10 at 4.38.19 PM

Or, above your navigator window select 1:1 or 3:1 to get the amount a zoom you need.

Click & drag on the box in the navigator window to choose the area you want to zoom in on.

Screen Shot 2014-10-10 at 4.38.30 PM

Just move the circle over the red area & click your mouse. It’s very simple & removes the red eye for you.

Un-zoom your photo.

Now, I’ll move over to the presets column.

Remember, presets are set edits, like a filter.

Or the “one size fits all” t-shirt.

You click on button & it automatically edits your photo.

Screen Shot 2014-10-10 at 4.49.49 PM

You can see that Lightroom comes with 7 different B&W presets.

I hoover on a few & view them in the navigation window to see which works best.

Screen Shot 2014-10-10 at 4.54.35 PM

I settle with B&W look 5

Screen Shot 2014-10-10 at 4.47.22 PM

Lightroom offers several different presets. Not just B&W presets.

You can also purchase additional presets.

You need to usually select if you want them for Lightroom or Photoshop.

Here you can see the progress we made.

The original. The LR b&W edit. An edit done with purchased presets.

tripleexample

I will go over in a later blog how to get the preset results, without the presets.

For now, know that you can get a lovely image using solely whatever preset is on the editing software you have.

IMG_0061-2

If you’ve enjoyed this post please take a minute to view & like my Facebook page by clocking {HERE}

Makeover Monday: Spot Removal Tool

A good photographer looks around the area before beginning their session.

Trash under the bench your subject is sitting on;

It doesn’t seem like a big deal now.

When that photograph is blown up & hung on the wall,

that nasty trash isn’t going to look as inconspicuous.

Look behind. Above. Under. Around. 

Sometimes you miss something. The object can’t be moved. Or, you don’t feel like puling all those weeds!

I’m going to show you step by step what I did to “clean up” this photo.

IMG_0152-3

Sometimes “clean up” style edits are easier to do in Photoshop (PS) or Photoshop Elements. (PSE)

However, Lightroom is capable & what I had on hand to edit on this photo.

The first thing I did was my use a “All in One Clean Edit” preset that I have.

Next, I used the crop overlay tool to straighten the image.

Then the soften image preset.

Presets & crop overly I went over on a previous post, “Basic Tools”.

IMG_0152-2

I’m going to introduce a new tool: Spot Removal.

In Lightroom 4 my spot removal is shown on the top right.

It’s the the circle with the arrow pointing to the side, next to our crop overlay tool.

Screen Shot 2014-10-10 at 11.22.59 AM

Screen Shot 2014-10-10 at 11.22.59 AM

This tool works as a clone.

You choose the spot that you want to remove.

But, then you need a new a spot to “clone” into it’s place.

I used the other side of her, to replace the spot where the weed was growing.

Screen Shot 2014-10-10 at 11.29.15 AM

The same with the next large weed

Screen Shot 2014-10-10 at 11.31.23 AM

and so on…

Screen Shot 2014-10-10 at 11.33.22 AM

The next part is trickier. Because there is grass on her shoe.

I have to blow the photo up & move small piece by small piece.

Remember this is a clone. So, for every piece I remove I need to find a new piece to replace it.

Screen Shot 2014-10-10 at 11.35.36 AM

I continue to work my way around the shoe.

It takes time finding the best replacement pieces so that it’s not obvious that it’s been touched up.

Screen Shot 2014-10-10 at 11.38.49 AM

Zooming in & out to make sure it’s looking cohesive still.

Sometimes when you zoom out you’ll find a piece you thought was good, is actually much brighter or darker & is obvious that it’s touched up.

Screen Shot 2014-10-10 at 11.45.02 AM

You’ve checked to make sure everything looks good both zoomed in & zoomed out.

Now, a final look over.

I decide I want to add a color punch preset, increasing the vibrance & saturation to add a pop of color.

Screen Shot 2014-10-10 at 11.48.35 AM

Here’s my final results…

BandA

I hear a lot of rumblings about why photographs charge so much.

It’s because edits like this take time. This one photo took about 15 minutes.

The details around the shoe was a majority of that time.

Most of my clients receive at least 15-20 images in their gallery.

Ideally, I am finding locations & knowing how to take a good SOOC photo, so that I don’t have to spend 15+ minutes editing one photo.

In general most photographers do at least some editing to the photos that you purchase.

IMG_0152-2

Hopefully, these last couple of weeks my “Makeover Mondays” have helped you to learn something new about editing.

If you’re attempting to learn more about photography continue to practice, practice, practice.

If you’re just following along & viewing my work….Keep in mind how much goes into making each your photos perfect!

There’s more to photography than just clicking a button on your fancy camera.

If you’ve enjoyed this post please take a minute to view & like my Facebook page by clicking {HERE}

Makeover Monday: Softening your photos

When I first started out pursuing photography

I would spend hours looking at other peoples work, trying to somehow learn from them by studying their images.

FYI: it doesn’t really work that way!

I loved the “soft” look that the people I admired seemed to capture in every photo.

IMG_0496

Being a newbie I tried to figure out how to capture that myself.

I couldn’t seem to get it SOOC (straight out of camera)

A lot of that had to do with my focus.

Last Monday I talked about having a good SOOC photo in order to make your editing work easier.

A good SOOC photo requires significant lighting, good composition, clear focus.

Here are 2 photos SOOC

SOOC

The top is one of my first times shooting in manual.

The bottom was taken this last spring.

As you can see in my earlier photo, I had not yet got a handle on lighting or focus.

You can do quite a bit to change your lighting with editing software. But, nothing can fix an out of focus image.

When I first stated playing around in Lightroom (the primary editing software I use)

I noticed that the was an adjustment for “noise reduction” listed under details.

I assumed if I moved the Luminance bar all the way to the right (reducing the noise) my photo would look soft.

Or if I moved my clarity down (the pic below is at -46 clarity) it would look soft.

howtosunflower

All either of those do though is eliminate detail in your photos.

It’s too soft! The details in her face & on the sunflower are almost non existent when done that way.

With my later photo I had good focus & decent lighting to start with.

IMG_0326-3

I actually like the later photo a little darker.

So, all I wanted to do was soften it just a tad.

I only soften a photo when it’s women of children.

To me it gives a innocent look.

It doesn’t alter the important details.

It only softens some of the outer edges/ background.

HowtoField

To achieve this you simply need to adjust your clarity.

I almost always set an image to -12 (clarity) to get the look I want.

****

Don’t be afraid to play with your images.

Make sure to copy your original photos. I usually make up to 5 copies.

Then edit them different ways. Use the compare button to look at them side by side.

Determine which adjustments get the desired look you want.

If you enjoyed this post please take a minute to view & like my Facebook page by clicking {HERE}

Makeover Monday: Editing Styles

When I first started out photographing

A photographer I admired told me,

“I wouldn’t consider myself a great photographer, I’d consider myself a great editor”.

That stuck with me.

With so many editing options available these days it’s easy to take an average snapshot & make it appear more like a significant photograph.

The options on how to edit are endless.

Add a vignette, make it black & white, add a filter, selective color. I could go on & on.

What makes a good edit?

mondaymakeover

As we all know, art is subjective….right?

I’m here to show you a couple examples of typical editing styles

&

a little about what I’ve learned when it comes to editing.

The first thing I’ve learned is that it’s WAY easier & quicker to start with a good photo SOOC.

SOOC = Straight out of Camera

When I say good I mean: significant lighting, good composition, clear focus.

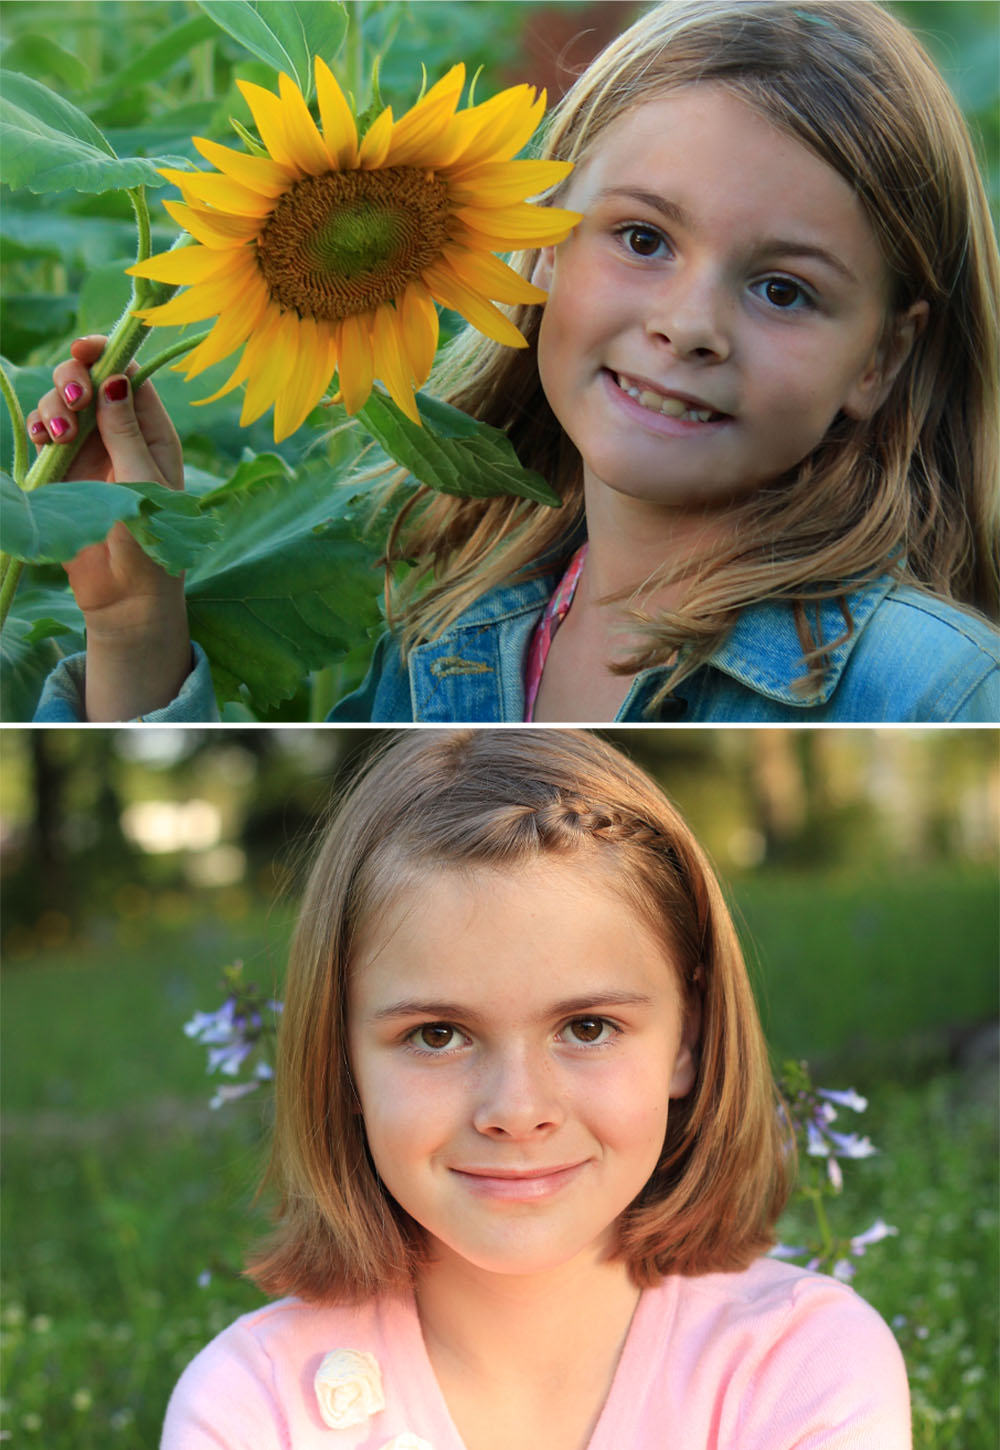
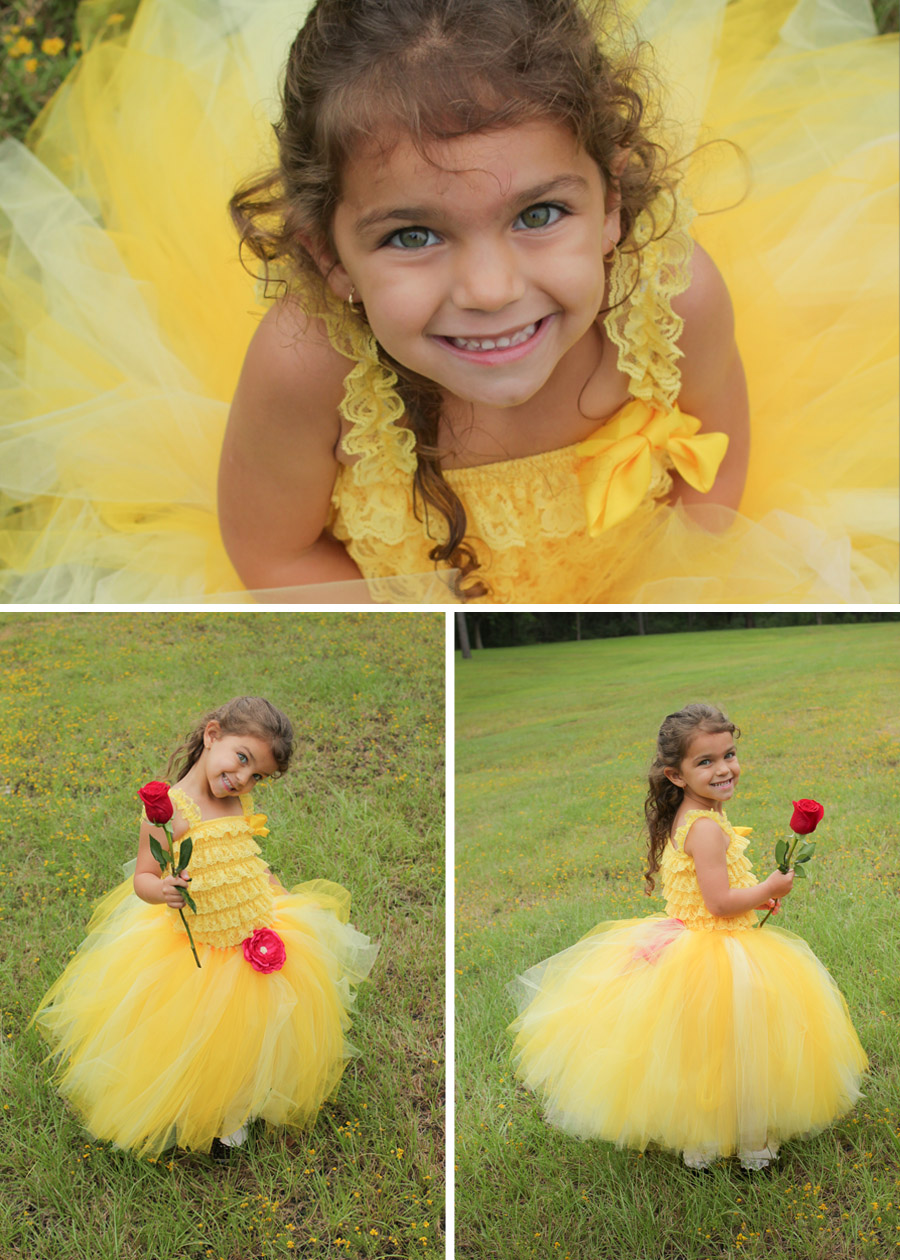
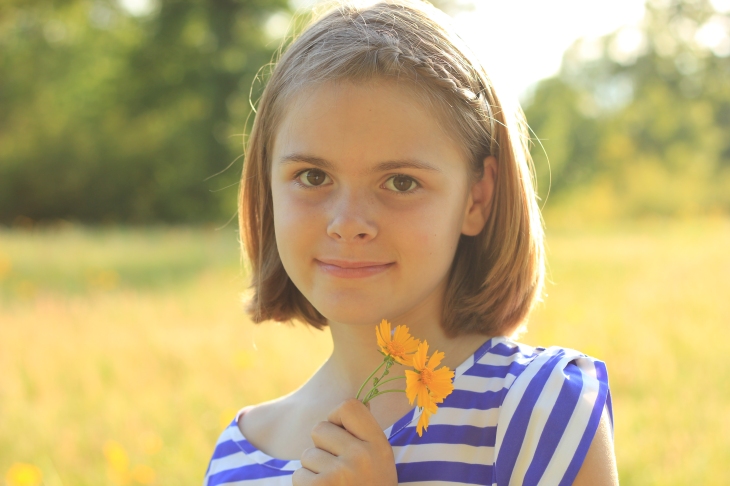
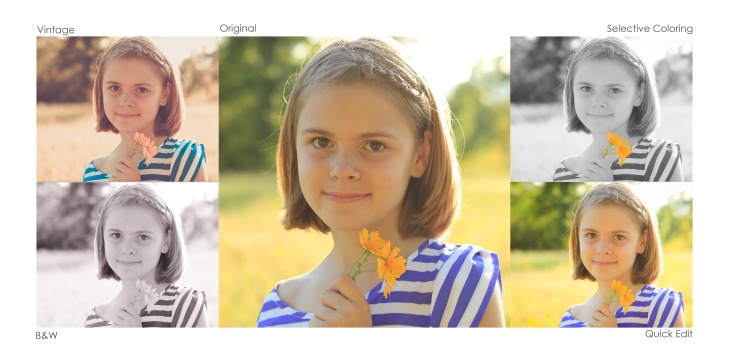
Here’s the image we’re going to work with today, SOOC.

IMG_0241-5

Now, the easiest thing to do on your computer, phone, tablet (wherever you’re editing your photos at) is to add a filter. A filter is pre-made edit. You click one button & it either subtly or dramatically makes all the changes to your image for you.

Here’s a vintage filter that I use a lot.

IMG_0241-2

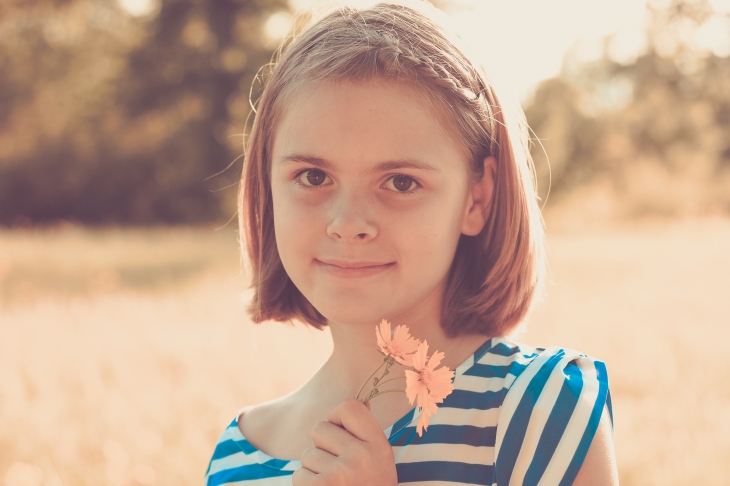
A filter is like wearing a one size fits all shirt. It might work. But, it’s not always going to look the best.

With this particular photo it makes any darker areas appear darker…like the circles under her eyes. You can obviously see how it changes  colors themselves, giving it that vintage look. I can’t use a filter like then when taking photos for vendors. It’s changes their product entirely. But, if you (or your client) is ok with it, then you can make their purple shirt turn blue. This also makes skin tones look more yellow. So, not a great edit for babies, as it makes them look jaundiced. I like to use a vintage edit when the subject is not up close (AKA: portraits).  For portraits I feel like it’s not usually the most flattering edit for the face.

There’s a term in the photography world that people use a lot.

Fauxtographer.

It’s not something you want to be called in the photography world.

One sure fire way to be called that name…..

show off something with selective coloring.

colorselection

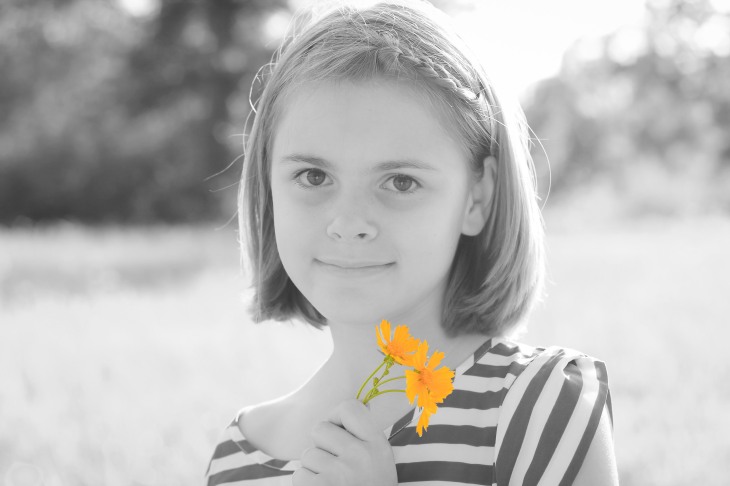
Selective coloring, shown above, is when you alter an image so that it’s primarily black & white (b&w).

However, you leave a part (or parts) still with the original color.

I do not do selective coloring unless specifically asked to be done by my client.

It’s often overused or incorrectly used by beginner photographers.

It’s rare to see it done well.

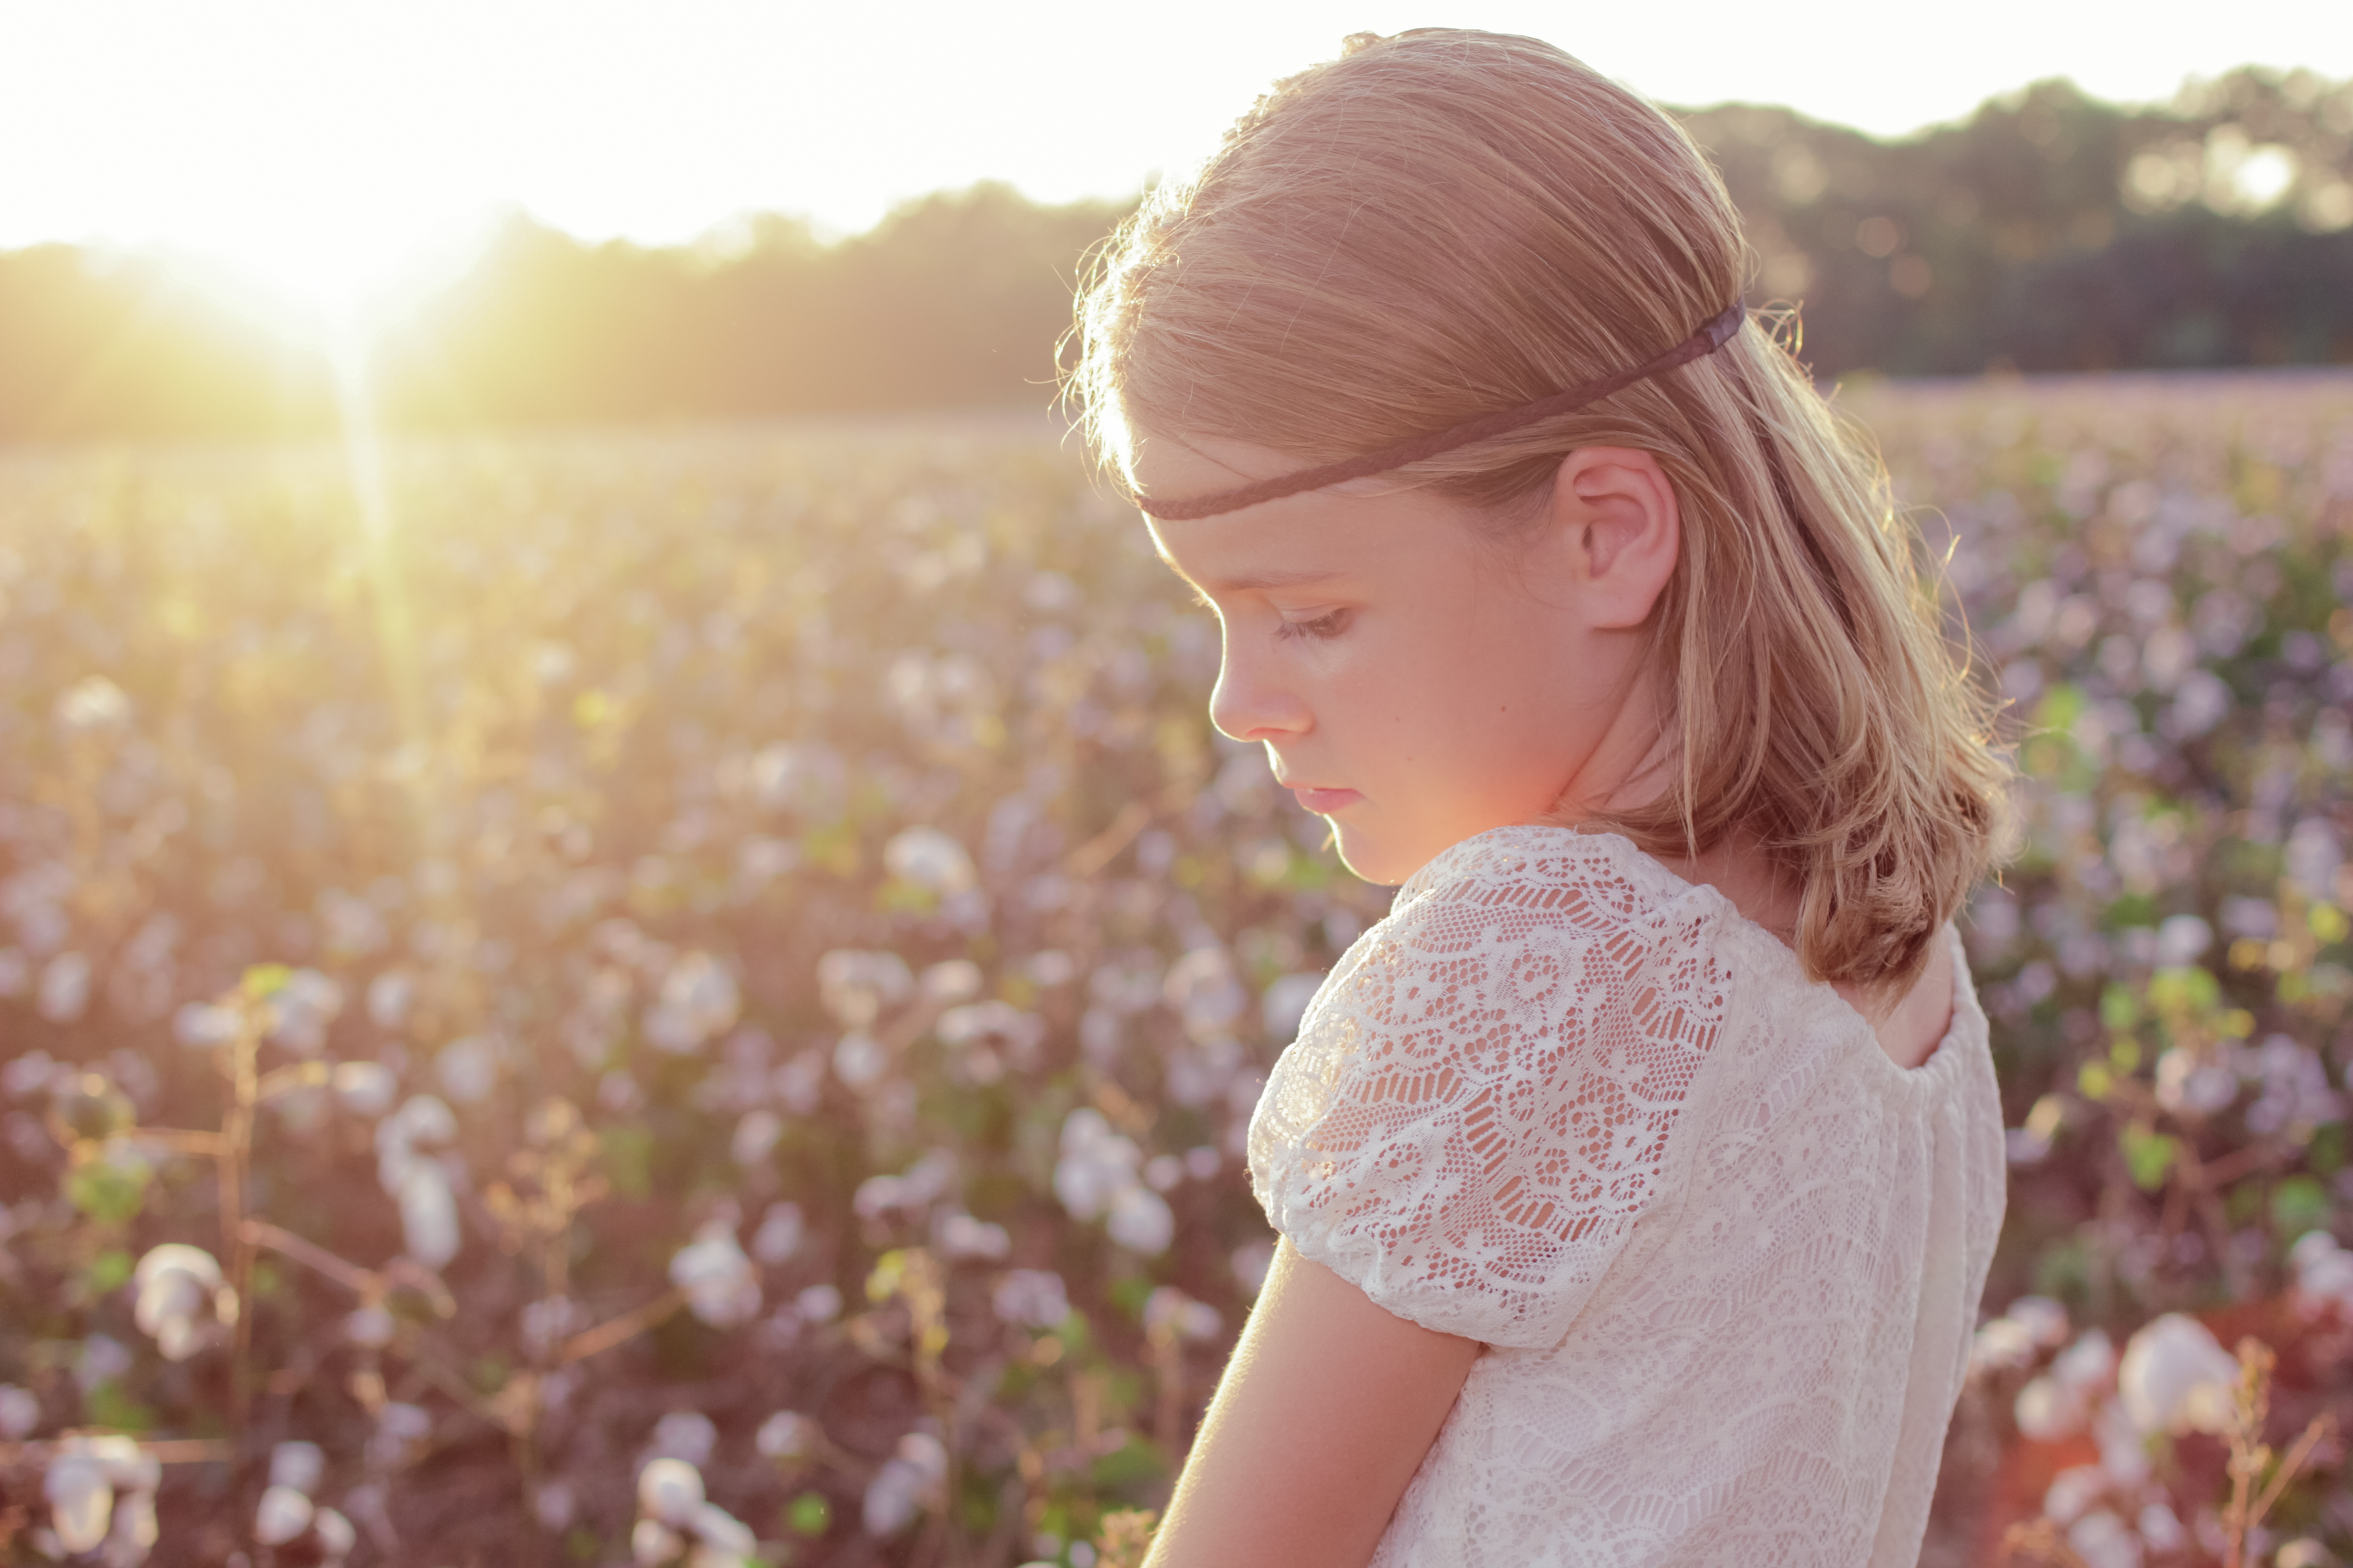
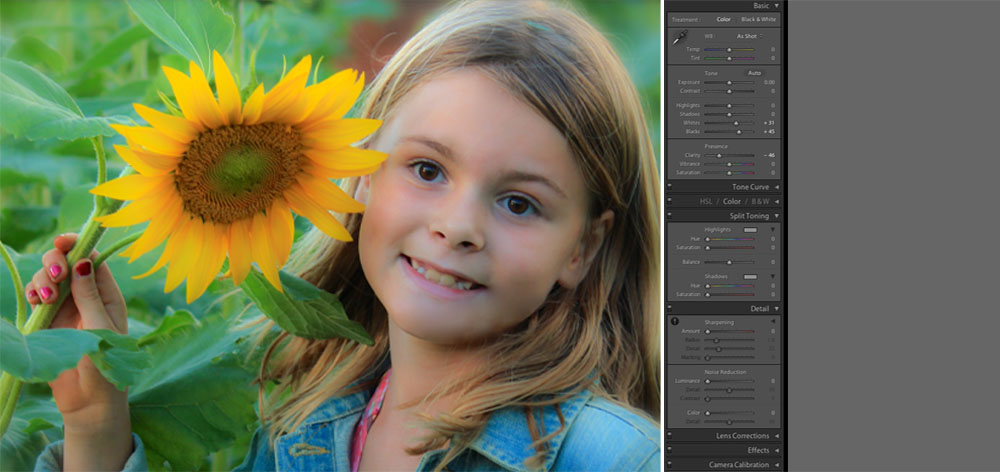
One key to a quality photograph, is having a clear focal point.

Who or what is the subject in your photograph?

With selective coloring, more often than not, people color in something that takes away from what the subject of the photo should be. Here, my intentional focus is the girl. With selective coloring my eye is immediately drawn to the flowers.

They’ve become the focal point. Not the girl.

So, if you’re  newbie, kudos for learning how to selective color in photoshop! It’s tough to learn (esp tough to do it with great accuracy!) However, just because you can do something, doesn’t mean you should.

Remember the one size fits all t-shirt?

Onto… the next edit.

IMG_0241-4

With a few exceptions, altering a photo to b&w is never a bad decision.

It’s a classic edit.

With b&w there are so many shades available!

We will go over some of them in a later blog. Highlighting which are better for your photo & why.

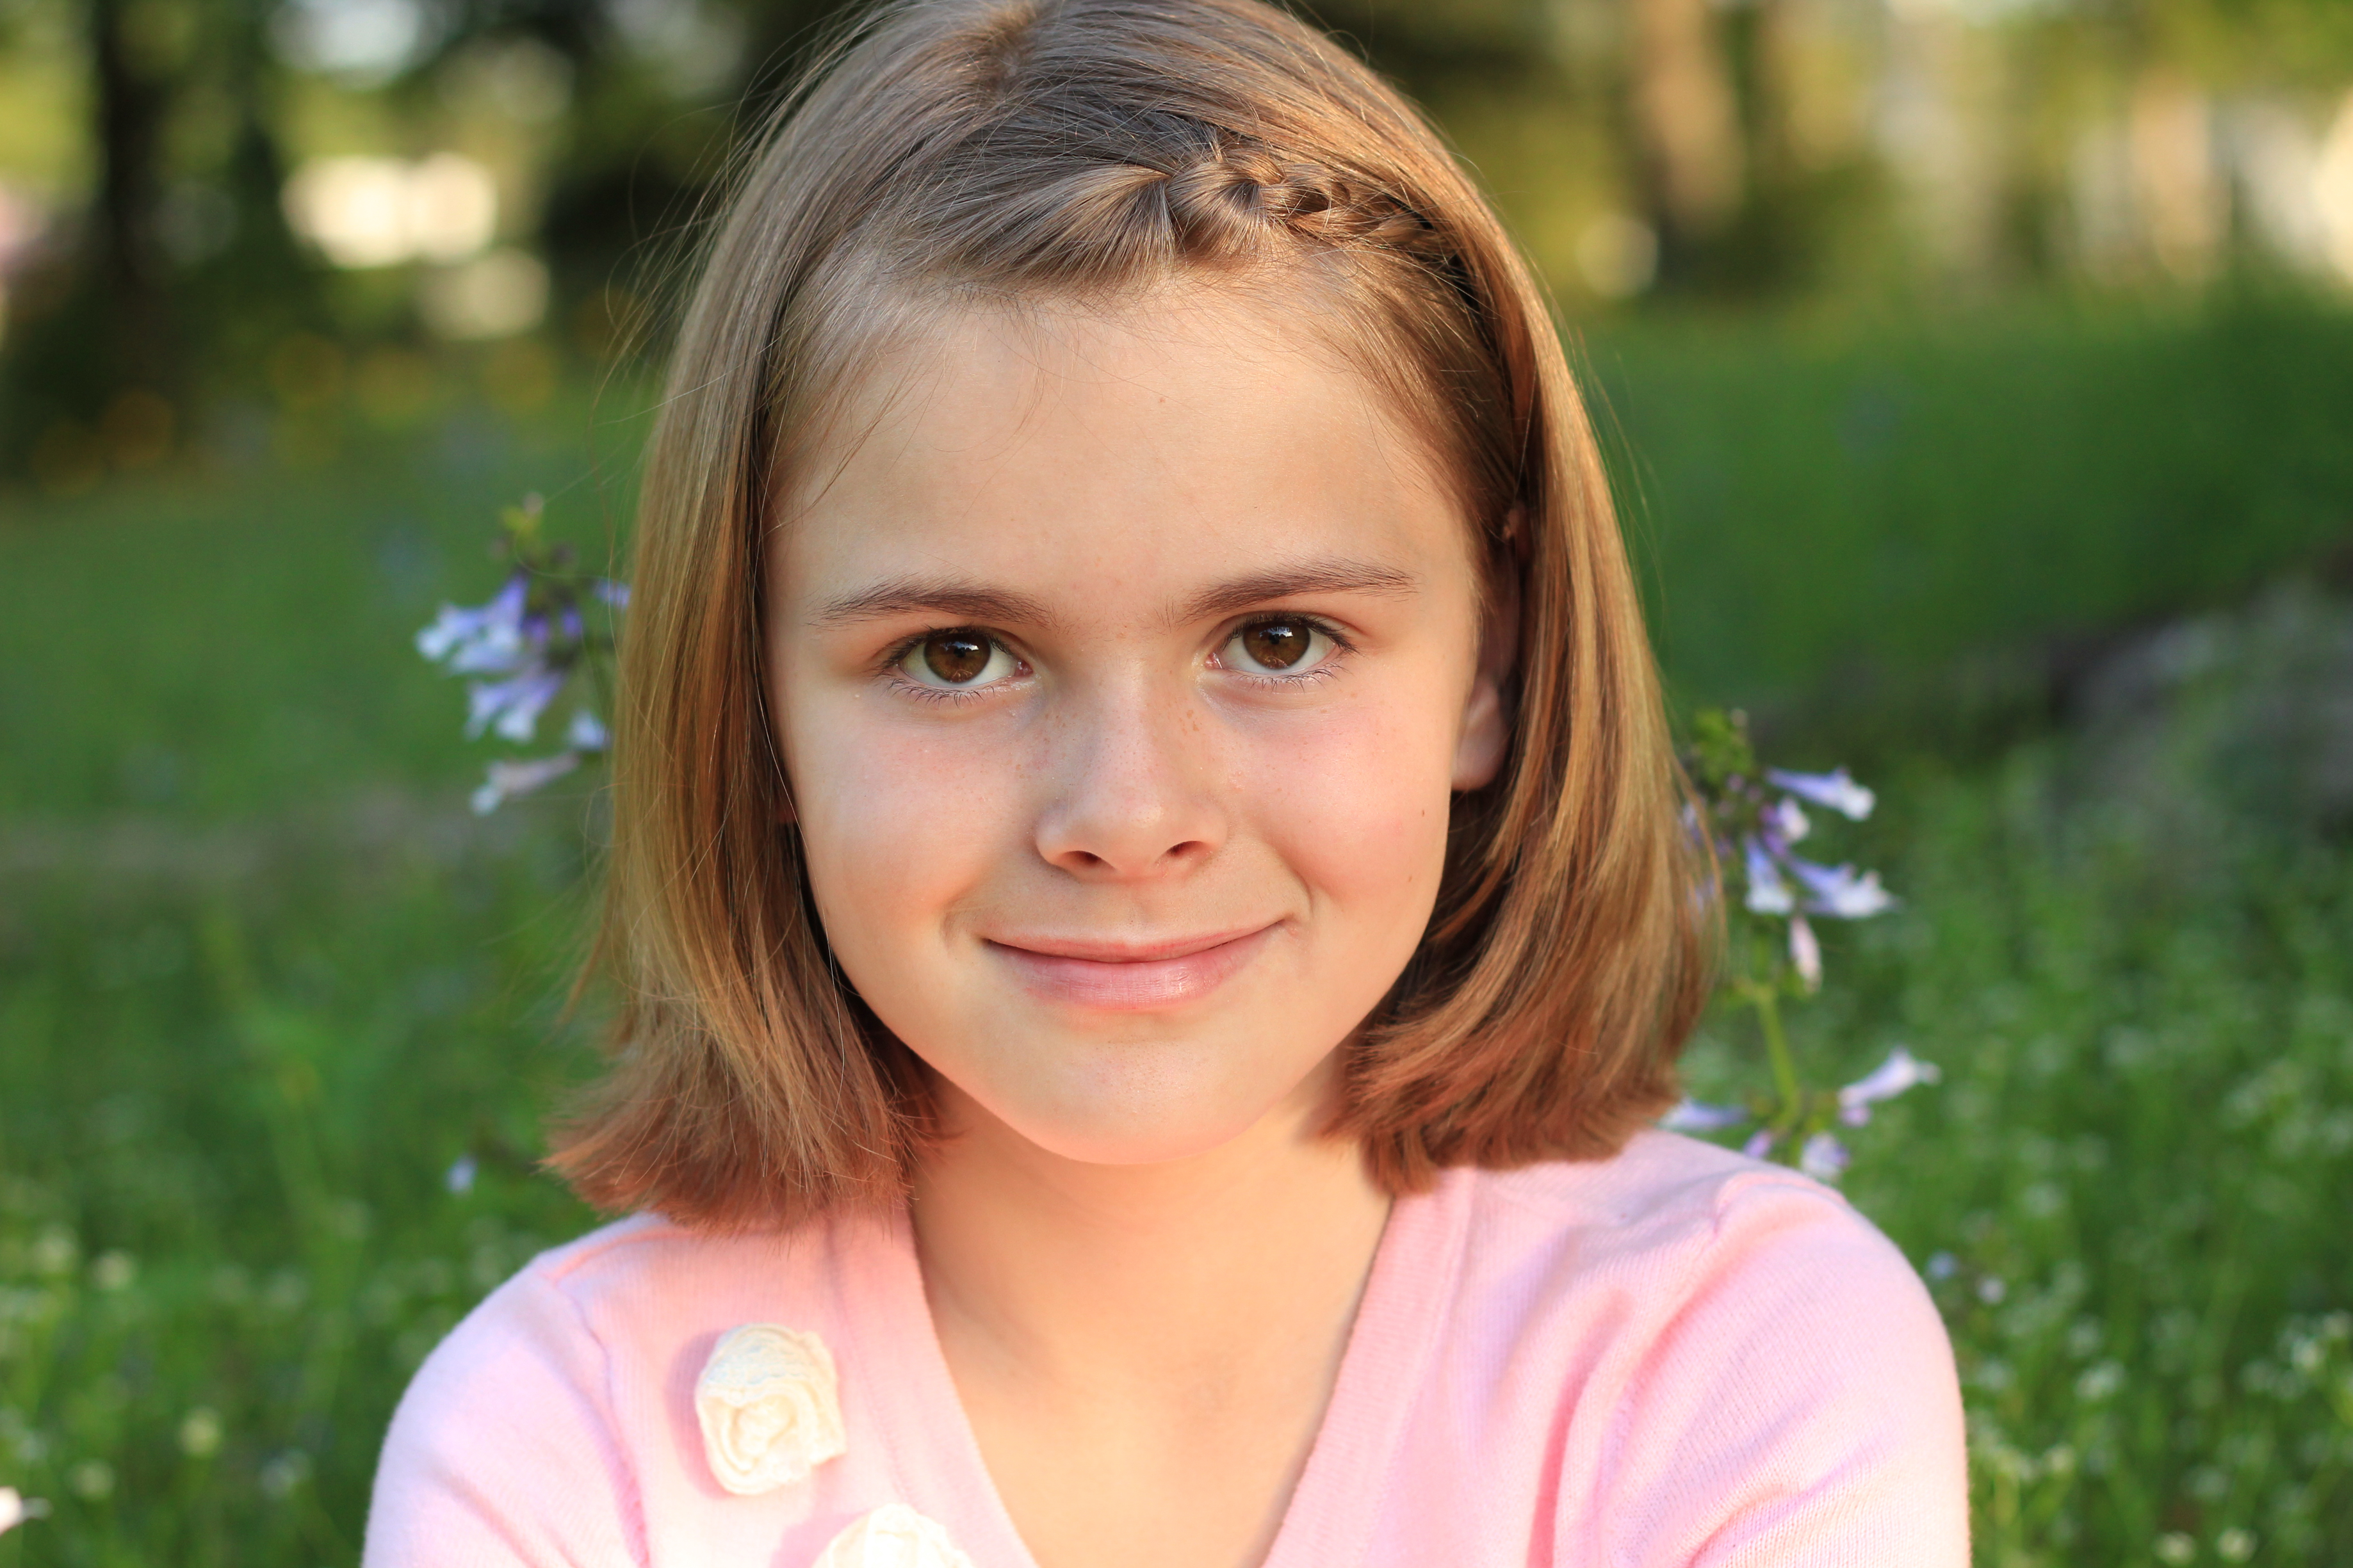
When I edit, I typically try to stick with the “less is more” philosophy.

IMG_0241-3

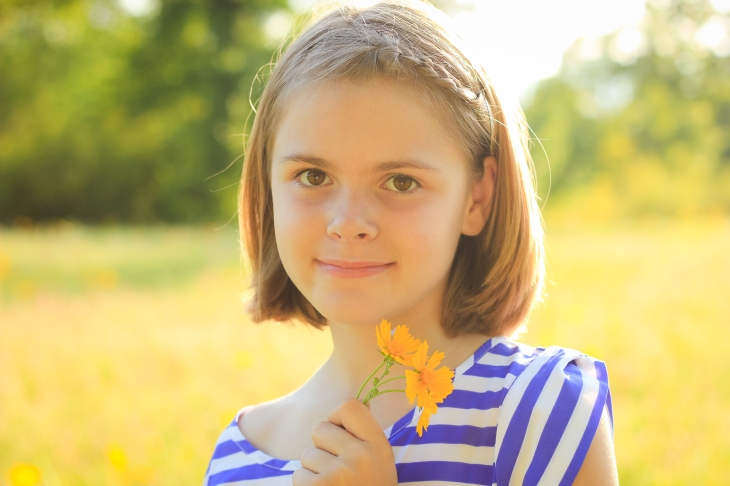
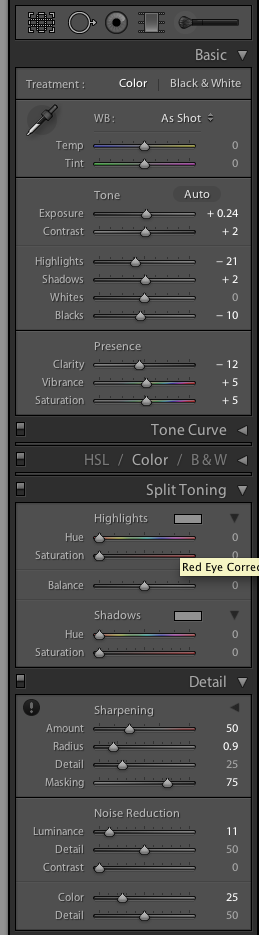
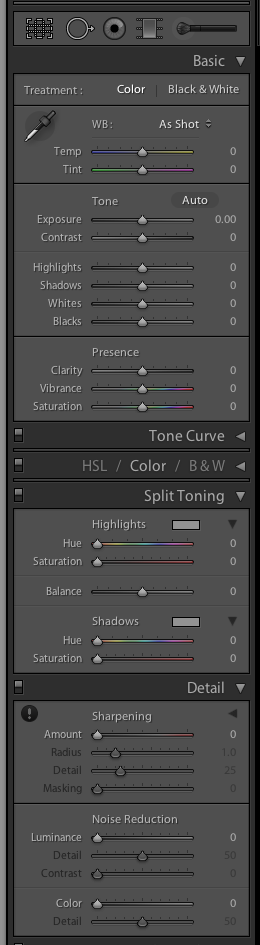
With my final edit on this image, I did the following:

  •  I removed a piece of hair that was longer than the rest, above her right shoulder.
  • I brightened her face just bit, removing shadows she had
  • I brightened her eyes just a bit. If you brighten them a bit it removes the darkness they tend to get when photographed. It keeps them natural looking.
  • I softened the photo as a whole (just a little) I soften a photo when photographing women & children.

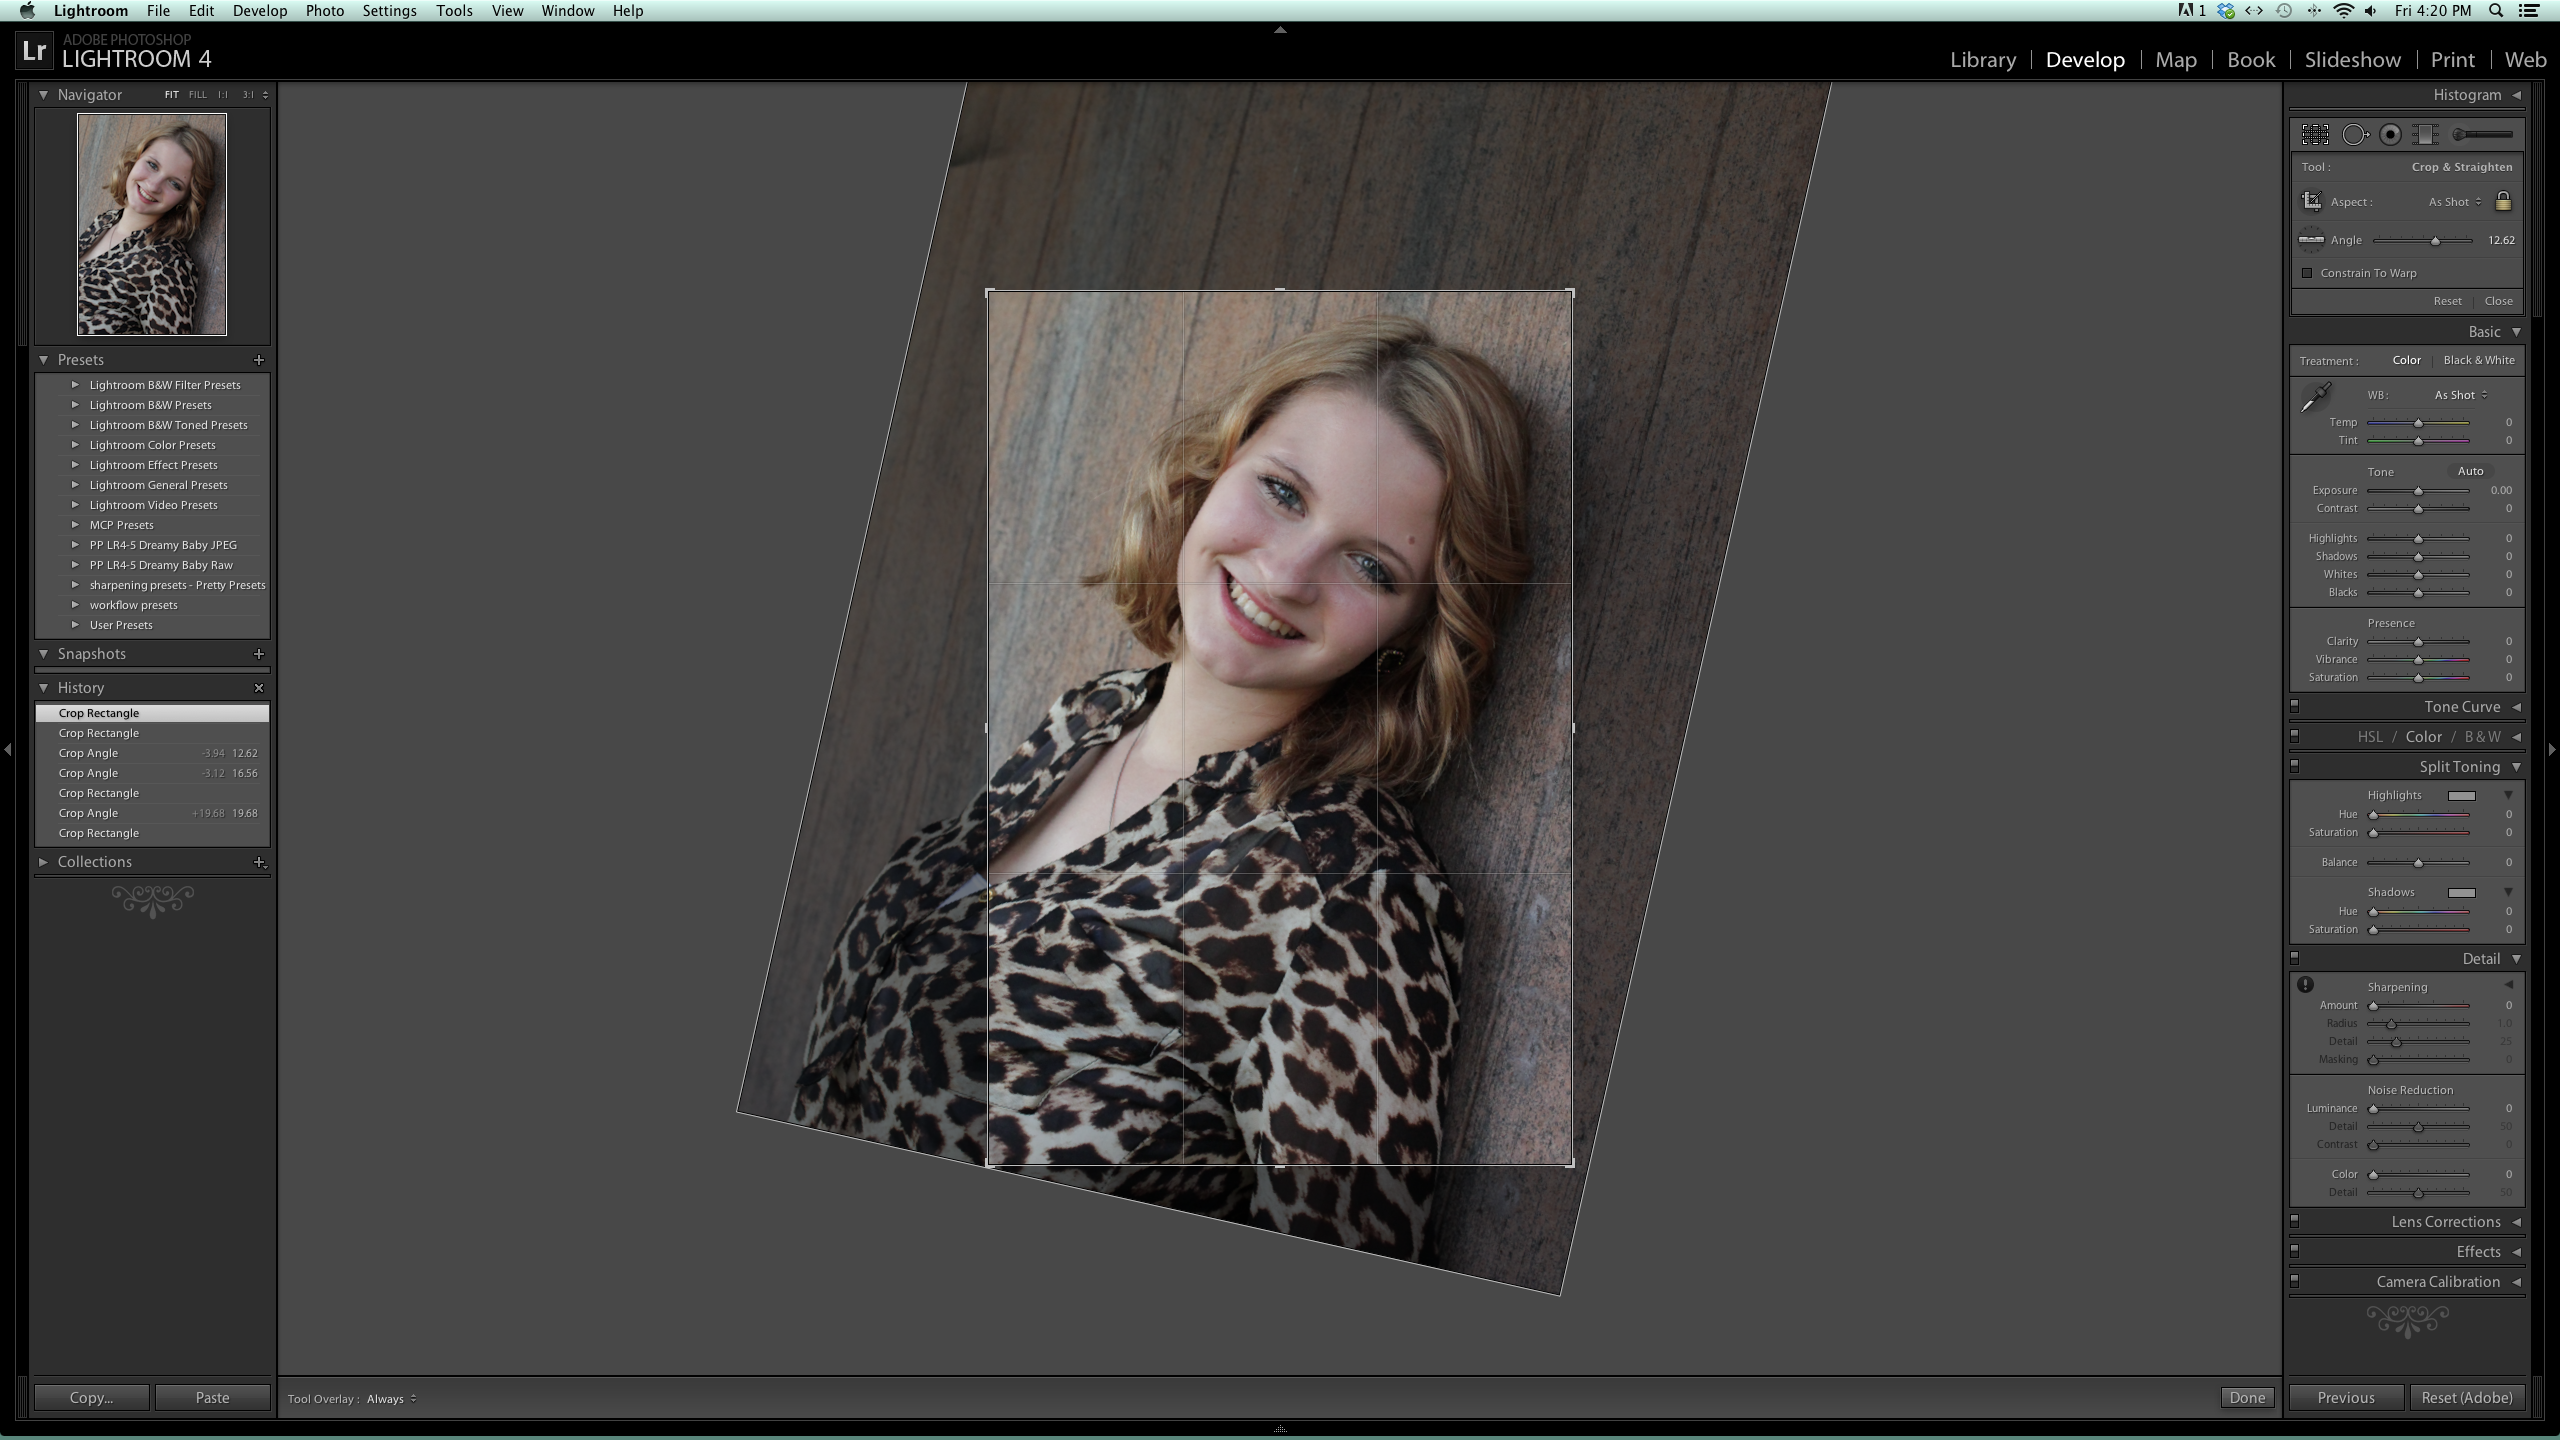
I primarily use lightroom to edit. Here’s a side-by-side view of my “notes”. The exact changes made to the “quick edit” image from above: (The left is the edited side. The right is where I started, so you can compare.)

Screen Shot 2014-10-09 at 3.34.30 PM   Screen Shot 2014-10-09 at 3.34.57 PM

These are just some very basic editing styles/tips.

Like I said there are tons of different editing styles!

None are necessarily  right or wrong.

When looking for a photographer, it’s good to find someone who has a fairly consistent editing style.

Otherwise, you may end up with photos you don’t love & weren’t expecting.

Most choose their photographer based on what their portfolio or previous work.

If the photographers work is different every time they edit, you never know what you’ll end up with.

mondaymakeover

My style tends to be bold & bright.

I photograph a lot of kids.

Sometimes I love that soft, white, cotton, airy look.

But, on a consistent basis the big, bright, bold colors more accurately capture the look of my children & the children I photograph.

Hopefully, this has given you something to think about when editing your own photos or when looking for a photographer to capture the special moments in your life.

If you’ve enjoyed this post. Please click {HERE} to become a fan of my Facebook page.

TUTU Maria- Vendor Review

I’ve been wanting to do a princess themed session for quite some time.

A friend of mine told me about a vendor named Tutu Maria.

According to her Facebook page she makes:

Handcrafted custom made tutus & hair accessories for your little lady! TUTU MARIA will design a tutu in the color tulle, ribbons, rhinestones & flowers of your little girls choice!

I looked through her album and immediately fell in love with several of her designs.

I contacted her & let her know my vision.

She quickly put together 2 gorgeous princess inspired tutus

& 1 princess inspired tutu dress.

Meanwhile I had gathered some beautiful models excited to be a princess for the afternoon.


The first design was inspired by Tiana: The Princess & the Frog

Tiana

This beautiful dress was made of light greens, yellows & cremes.

With the satin halter we were able to adjust the neck & back to fit her perfectly!

The shabby flowers in the front were a delightful detail.

The coordinating piece clipped effortlessly  into her hair. However, you could easily clip it onto the dress as well.


The next design was inspired by Elsa: Frozen

Elsa-8 copy

Can you guess what both models asked to do during this session?

Yup, they both were very excited to sing to me “Let it Go!”

Of course I couldn’t say no.

This fabulous tutu wouldn’t be truly Elsa inspired without inspiring someone to belt out that tune!

The beautiful blues & whites in this tutu made it look as if it glimmered in the sunlight.

Paired with a white top & cape you have a perfect princess Elsa.


Our final outfit was inspired by Belle: Beauty & the Beast. 

Belle

Belle means beauty or lovely. This gorgeous outfit held true to it’s name!

The red flower & ribbon looked stunning against the bright yellow.

My little model had a wonderful time twirling & running in this voluminous tutu.

The lace one-piece romper underneath is perfect for little princesses on the go.


Other than the speedy turnaround time, between placing my order & receiving my product,

I was most impressed with the quality of the work!

Details

The details were impeccable.

The tutus themselves were light. Yet, the stitching felt very durable!

Making me feel confident that it would last through many dress up days.

I was thoroughly impressed with each of these designs.

They definitely had the approval of my little models as well!


Good news for you!

TUTU Maria has agreed to offer a 10% discount for anyone who makes a purchase in the next 30 days.

(and mentions Christal Gavin Photography)

Click {HERE} to access her Etsy page

With Halloween just around the corner, a customized tutu or tutu dress is a great way to go!

For even more motivation:

I will be offering a costume mini session Oct. 25th.

Come get fun, customized photos of your little one(s) in their costumes.

Click {HERE} to find more details on my Facebook page.

Baby Girl

I’ve been waiting for a chance to photograph a baby girl. I have lots of cute newborn headbands (from some fabulous vendors) that I’ve been anxious to try. Lucky for me this sweet baby girl was born into my neighborhood this month

Image

She’s so perfectly tiny, at 11 days young, that she fit cozily into the hands of her daddy

Image

Her parents we so thankful that he was able to be here for the birth. Being that he’s a soldier, it’s not always possible.

Image

One great thing about newborn photos is being able to incorporate something special into the session. This blanket belonged to her mamma when she was a baby

Image

This adorable autumn baby made my job easy by sleeping through most of the session

Image

If you’ve enjoyed viewing these photos, please be sure to “like” my Facebook page:

Christal Gavin Photography

There you will be able to stay up to date with my most recent news & sessions

Thanks to Pink Pineapple Couture & C Sister Bands for some of the adorable headbands pictured above