Makeover Monday: Basic Tools

I’m going to walk you through how to do a quick edit using the tools provided in Lightroom 4. (LR4)

Let’s start with our SOOC (straight out of camera) image.

IMG_0061-3

The first thing we’re going to do is use our crop tool.

Located on the top right corner.

It looks like a grid.

Screen Shot 2014-10-10 at 4.25.24 PM

We’re going to hold down the mouse & move it to the right, to get the image to rotate.

Screen Shot 2014-10-10 at 4.20.50 PM

SIDEBAR:

See the small photo on the top left of my screen shot.

That’s the navigate window.

You can hoover over a choice (like convert to B&W) & it will show you what it would look like.

In this case it’s showing what our final rotated image would look like, once we let go of our mouse.

You can see in my history (located to the left of the screen shot, the last grey block)

that I’ve rotated it a few times to get the look I want

Screen Shot 2014-10-10 at 4.20.53 PM

Now, if I had any red eyes, I would correct it here.

Using the circle with the dot in the middle.

Screen Shot 2014-10-10 at 4.37.04 PM

You can either click on the image itself to zoom in.

Screen Shot 2014-10-10 at 4.38.19 PM

Or, above your navigator window select 1:1 or 3:1 to get the amount a zoom you need.

Click & drag on the box in the navigator window to choose the area you want to zoom in on.

Screen Shot 2014-10-10 at 4.38.30 PM

Just move the circle over the red area & click your mouse. It’s very simple & removes the red eye for you.

Un-zoom your photo.

Now, I’ll move over to the presets column.

Remember, presets are set edits, like a filter.

Or the “one size fits all” t-shirt.

You click on button & it automatically edits your photo.

Screen Shot 2014-10-10 at 4.49.49 PM

You can see that Lightroom comes with 7 different B&W presets.

I hoover on a few & view them in the navigation window to see which works best.

Screen Shot 2014-10-10 at 4.54.35 PM

I settle with B&W look 5

Screen Shot 2014-10-10 at 4.47.22 PM

Lightroom offers several different presets. Not just B&W presets.

You can also purchase additional presets.

You need to usually select if you want them for Lightroom or Photoshop.

Here you can see the progress we made.

The original. The LR b&W edit. An edit done with purchased presets.

tripleexample

I will go over in a later blog how to get the preset results, without the presets.

For now, know that you can get a lovely image using solely whatever preset is on the editing software you have.

IMG_0061-2

If you’ve enjoyed this post please take a minute to view & like my Facebook page by clocking {HERE}

Makeover Monday: Spot Removal Tool

A good photographer looks around the area before beginning their session.

Trash under the bench your subject is sitting on;

It doesn’t seem like a big deal now.

When that photograph is blown up & hung on the wall,

that nasty trash isn’t going to look as inconspicuous.

Look behind. Above. Under. Around. 

Sometimes you miss something. The object can’t be moved. Or, you don’t feel like puling all those weeds!

I’m going to show you step by step what I did to “clean up” this photo.

IMG_0152-3

Sometimes “clean up” style edits are easier to do in Photoshop (PS) or Photoshop Elements. (PSE)

However, Lightroom is capable & what I had on hand to edit on this photo.

The first thing I did was my use a “All in One Clean Edit” preset that I have.

Next, I used the crop overlay tool to straighten the image.

Then the soften image preset.

Presets & crop overly I went over on a previous post, “Basic Tools”.

IMG_0152-2

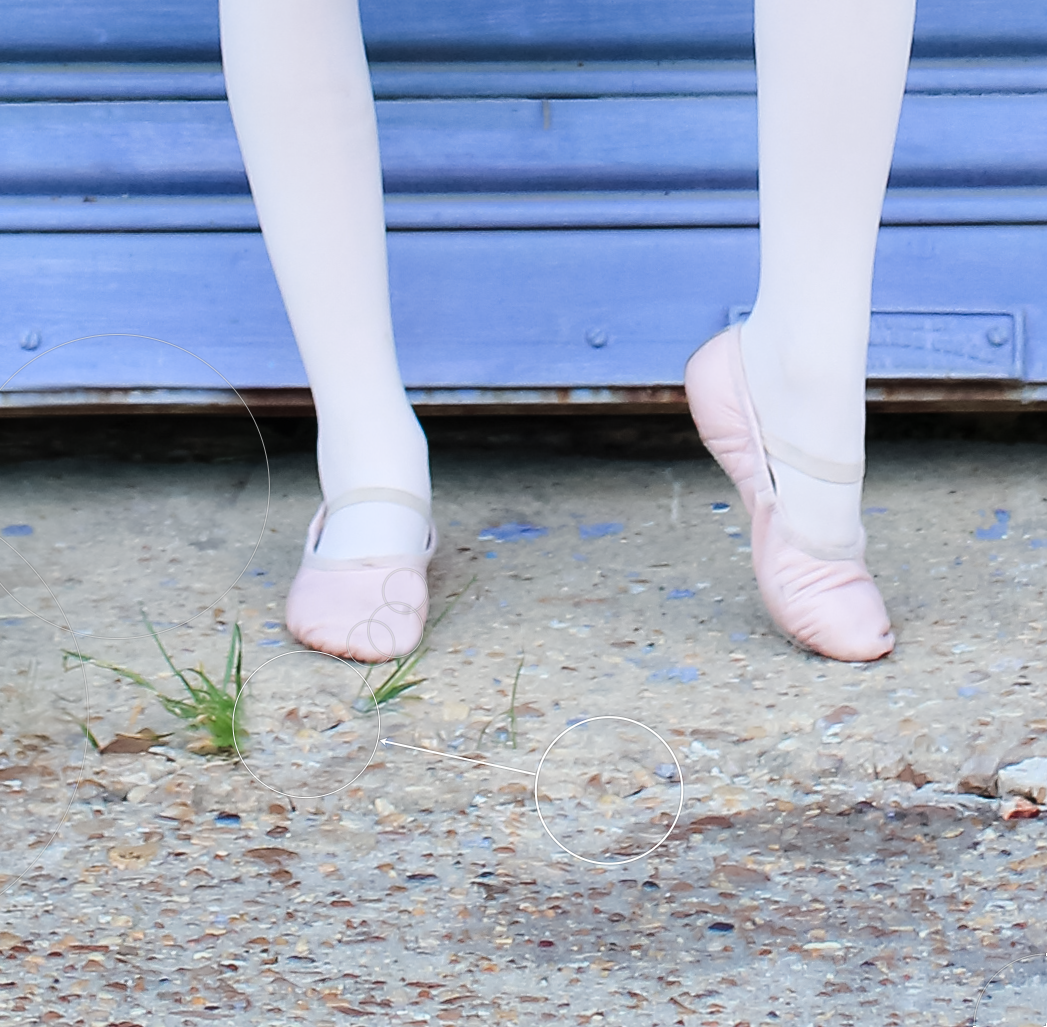
I’m going to introduce a new tool: Spot Removal.

In Lightroom 4 my spot removal is shown on the top right.

It’s the the circle with the arrow pointing to the side, next to our crop overlay tool.

Screen Shot 2014-10-10 at 11.22.59 AM

Screen Shot 2014-10-10 at 11.22.59 AM

This tool works as a clone.

You choose the spot that you want to remove.

But, then you need a new a spot to “clone” into it’s place.

I used the other side of her, to replace the spot where the weed was growing.

Screen Shot 2014-10-10 at 11.29.15 AM

The same with the next large weed

Screen Shot 2014-10-10 at 11.31.23 AM

and so on…

Screen Shot 2014-10-10 at 11.33.22 AM

The next part is trickier. Because there is grass on her shoe.

I have to blow the photo up & move small piece by small piece.

Remember this is a clone. So, for every piece I remove I need to find a new piece to replace it.

Screen Shot 2014-10-10 at 11.35.36 AM

I continue to work my way around the shoe.

It takes time finding the best replacement pieces so that it’s not obvious that it’s been touched up.

Screen Shot 2014-10-10 at 11.38.49 AM

Zooming in & out to make sure it’s looking cohesive still.

Sometimes when you zoom out you’ll find a piece you thought was good, is actually much brighter or darker & is obvious that it’s touched up.

Screen Shot 2014-10-10 at 11.45.02 AM

You’ve checked to make sure everything looks good both zoomed in & zoomed out.

Now, a final look over.

I decide I want to add a color punch preset, increasing the vibrance & saturation to add a pop of color.

Screen Shot 2014-10-10 at 11.48.35 AM

Here’s my final results…

BandA

I hear a lot of rumblings about why photographs charge so much.

It’s because edits like this take time. This one photo took about 15 minutes.

The details around the shoe was a majority of that time.

Most of my clients receive at least 15-20 images in their gallery.

Ideally, I am finding locations & knowing how to take a good SOOC photo, so that I don’t have to spend 15+ minutes editing one photo.

In general most photographers do at least some editing to the photos that you purchase.

IMG_0152-2

Hopefully, these last couple of weeks my “Makeover Mondays” have helped you to learn something new about editing.

If you’re attempting to learn more about photography continue to practice, practice, practice.

If you’re just following along & viewing my work….Keep in mind how much goes into making each your photos perfect!

There’s more to photography than just clicking a button on your fancy camera.

If you’ve enjoyed this post please take a minute to view & like my Facebook page by clicking {HERE}

Makeover Monday: Softening your photos

When I first started out pursuing photography

I would spend hours looking at other peoples work, trying to somehow learn from them by studying their images.

FYI: it doesn’t really work that way!

I loved the “soft” look that the people I admired seemed to capture in every photo.

IMG_0496

Being a newbie I tried to figure out how to capture that myself.

I couldn’t seem to get it SOOC (straight out of camera)

A lot of that had to do with my focus.

Last Monday I talked about having a good SOOC photo in order to make your editing work easier.

A good SOOC photo requires significant lighting, good composition, clear focus.

Here are 2 photos SOOC

SOOC

The top is one of my first times shooting in manual.

The bottom was taken this last spring.

As you can see in my earlier photo, I had not yet got a handle on lighting or focus.

You can do quite a bit to change your lighting with editing software. But, nothing can fix an out of focus image.

When I first stated playing around in Lightroom (the primary editing software I use)

I noticed that the was an adjustment for “noise reduction” listed under details.

I assumed if I moved the Luminance bar all the way to the right (reducing the noise) my photo would look soft.

Or if I moved my clarity down (the pic below is at -46 clarity) it would look soft.

howtosunflower

All either of those do though is eliminate detail in your photos.

It’s too soft! The details in her face & on the sunflower are almost non existent when done that way.

With my later photo I had good focus & decent lighting to start with.

IMG_0326-3

I actually like the later photo a little darker.

So, all I wanted to do was soften it just a tad.

I only soften a photo when it’s women of children.

To me it gives a innocent look.

It doesn’t alter the important details.

It only softens some of the outer edges/ background.

HowtoField

To achieve this you simply need to adjust your clarity.

I almost always set an image to -12 (clarity) to get the look I want.

****

Don’t be afraid to play with your images.

Make sure to copy your original photos. I usually make up to 5 copies.

Then edit them different ways. Use the compare button to look at them side by side.

Determine which adjustments get the desired look you want.

If you enjoyed this post please take a minute to view & like my Facebook page by clicking {HERE}

Makeover Monday: Editing Styles

When I first started out photographing

A photographer I admired told me,

“I wouldn’t consider myself a great photographer, I’d consider myself a great editor”.

That stuck with me.

With so many editing options available these days it’s easy to take an average snapshot & make it appear more like a significant photograph.

The options on how to edit are endless.

Add a vignette, make it black & white, add a filter, selective color. I could go on & on.

What makes a good edit?

mondaymakeover

As we all know, art is subjective….right?

I’m here to show you a couple examples of typical editing styles

&

a little about what I’ve learned when it comes to editing.

The first thing I’ve learned is that it’s WAY easier & quicker to start with a good photo SOOC.

SOOC = Straight out of Camera

When I say good I mean: significant lighting, good composition, clear focus.

Here’s the image we’re going to work with today, SOOC.

IMG_0241-5

Now, the easiest thing to do on your computer, phone, tablet (wherever you’re editing your photos at) is to add a filter. A filter is pre-made edit. You click one button & it either subtly or dramatically makes all the changes to your image for you.

Here’s a vintage filter that I use a lot.

IMG_0241-2

A filter is like wearing a one size fits all shirt. It might work. But, it’s not always going to look the best.

With this particular photo it makes any darker areas appear darker…like the circles under her eyes. You can obviously see how it changes  colors themselves, giving it that vintage look. I can’t use a filter like then when taking photos for vendors. It’s changes their product entirely. But, if you (or your client) is ok with it, then you can make their purple shirt turn blue. This also makes skin tones look more yellow. So, not a great edit for babies, as it makes them look jaundiced. I like to use a vintage edit when the subject is not up close (AKA: portraits).  For portraits I feel like it’s not usually the most flattering edit for the face.

There’s a term in the photography world that people use a lot.

Fauxtographer.

It’s not something you want to be called in the photography world.

One sure fire way to be called that name…..

show off something with selective coloring.

colorselection

Selective coloring, shown above, is when you alter an image so that it’s primarily black & white (b&w).

However, you leave a part (or parts) still with the original color.

I do not do selective coloring unless specifically asked to be done by my client.

It’s often overused or incorrectly used by beginner photographers.

It’s rare to see it done well.

One key to a quality photograph, is having a clear focal point.

Who or what is the subject in your photograph?

With selective coloring, more often than not, people color in something that takes away from what the subject of the photo should be. Here, my intentional focus is the girl. With selective coloring my eye is immediately drawn to the flowers.

They’ve become the focal point. Not the girl.

So, if you’re  newbie, kudos for learning how to selective color in photoshop! It’s tough to learn (esp tough to do it with great accuracy!) However, just because you can do something, doesn’t mean you should.

Remember the one size fits all t-shirt?

Onto… the next edit.

IMG_0241-4

With a few exceptions, altering a photo to b&w is never a bad decision.

It’s a classic edit.

With b&w there are so many shades available!

We will go over some of them in a later blog. Highlighting which are better for your photo & why.

When I edit, I typically try to stick with the “less is more” philosophy.

IMG_0241-3

With my final edit on this image, I did the following:

  •  I removed a piece of hair that was longer than the rest, above her right shoulder.
  • I brightened her face just bit, removing shadows she had
  • I brightened her eyes just a bit. If you brighten them a bit it removes the darkness they tend to get when photographed. It keeps them natural looking.
  • I softened the photo as a whole (just a little) I soften a photo when photographing women & children.

I primarily use lightroom to edit. Here’s a side-by-side view of my “notes”. The exact changes made to the “quick edit” image from above: (The left is the edited side. The right is where I started, so you can compare.)

Screen Shot 2014-10-09 at 3.34.30 PM   Screen Shot 2014-10-09 at 3.34.57 PM

These are just some very basic editing styles/tips.

Like I said there are tons of different editing styles!

None are necessarily  right or wrong.

When looking for a photographer, it’s good to find someone who has a fairly consistent editing style.

Otherwise, you may end up with photos you don’t love & weren’t expecting.

Most choose their photographer based on what their portfolio or previous work.

If the photographers work is different every time they edit, you never know what you’ll end up with.

mondaymakeover

My style tends to be bold & bright.

I photograph a lot of kids.

Sometimes I love that soft, white, cotton, airy look.

But, on a consistent basis the big, bright, bold colors more accurately capture the look of my children & the children I photograph.

Hopefully, this has given you something to think about when editing your own photos or when looking for a photographer to capture the special moments in your life.

If you’ve enjoyed this post. Please click {HERE} to become a fan of my Facebook page.

TUTU Maria- Vendor Review

I’ve been wanting to do a princess themed session for quite some time.

A friend of mine told me about a vendor named Tutu Maria.

According to her Facebook page she makes:

Handcrafted custom made tutus & hair accessories for your little lady! TUTU MARIA will design a tutu in the color tulle, ribbons, rhinestones & flowers of your little girls choice!

I looked through her album and immediately fell in love with several of her designs.

I contacted her & let her know my vision.

She quickly put together 2 gorgeous princess inspired tutus

& 1 princess inspired tutu dress.

Meanwhile I had gathered some beautiful models excited to be a princess for the afternoon.


The first design was inspired by Tiana: The Princess & the Frog

Tiana

This beautiful dress was made of light greens, yellows & cremes.

With the satin halter we were able to adjust the neck & back to fit her perfectly!

The shabby flowers in the front were a delightful detail.

The coordinating piece clipped effortlessly  into her hair. However, you could easily clip it onto the dress as well.


The next design was inspired by Elsa: Frozen

Elsa-8 copy

Can you guess what both models asked to do during this session?

Yup, they both were very excited to sing to me “Let it Go!”

Of course I couldn’t say no.

This fabulous tutu wouldn’t be truly Elsa inspired without inspiring someone to belt out that tune!

The beautiful blues & whites in this tutu made it look as if it glimmered in the sunlight.

Paired with a white top & cape you have a perfect princess Elsa.


Our final outfit was inspired by Belle: Beauty & the Beast. 

Belle

Belle means beauty or lovely. This gorgeous outfit held true to it’s name!

The red flower & ribbon looked stunning against the bright yellow.

My little model had a wonderful time twirling & running in this voluminous tutu.

The lace one-piece romper underneath is perfect for little princesses on the go.


Other than the speedy turnaround time, between placing my order & receiving my product,

I was most impressed with the quality of the work!

Details

The details were impeccable.

The tutus themselves were light. Yet, the stitching felt very durable!

Making me feel confident that it would last through many dress up days.

I was thoroughly impressed with each of these designs.

They definitely had the approval of my little models as well!


Good news for you!

TUTU Maria has agreed to offer a 10% discount for anyone who makes a purchase in the next 30 days.

(and mentions Christal Gavin Photography)

Click {HERE} to access her Etsy page

With Halloween just around the corner, a customized tutu or tutu dress is a great way to go!

For even more motivation:

I will be offering a costume mini session Oct. 25th.

Come get fun, customized photos of your little one(s) in their costumes.

Click {HERE} to find more details on my Facebook page.

You’ve Come a Long Way

A couple months ago I was approached by a man named Glen.

Glen used to own a recording studio.

During that time he had written a song for his daughter.

It’s a country song about him watching her grow;

From tricycles to bicycles,

all the way up to her wedding day.

 IMG_0090

Now that he’s supposed to be retired, he decided to do something more with what he had written.

He wanted to create a CD & a greeting card using the lyrics.

He had already done all the leg work of turning his dream into a reality.

The song was recorded in Nashville with accomplished musician, Randy Mason

and already put into Cd form.

IMG_0076

He asked me to take some photos that he could use to advertise with.

He gave me very little direction, which made my job fun!

Since it is a wedding them song, I needed a model with a wedding dress.

This gorgeous lady volunteered for the job.

IMG_0163

We took a variety of different shots with the CD.

IMG_0055

We also had some fun at the end getting some more shots of my model

IMG_0159

We couldn’t let her get all dolled up & not do more photos of just her!

Glen chose his top photos & has since gotten things finalized to sale.

I was so excited to be a part of his project & wish him all the best in his endeavor!

You can preview & purchase his song {HERE}

If you like what you’ve seen I’d love for you to become a fan of my Facebook page.

Click {HERE} to view my page

where you’ll be the first to see specials, casting calls & giveaways.

I am a mom.

I have three kids; a daughter & twin sons.

Sometimes, people tell me that my kids are “busy”.

What they really mean is, they think my kids are crazy!

Some days….. Most days,  I agree.

Then I remember that they are kids.

They’re only kids once!

One of the reasons I love photographing children is because they have an innocence about them.

They look at things differently around them.

They see beauty in things, that as adults, we don’t always take the time to see.

Everything is exciting. Everything is an adventure. Everything is messy.

I decided to photograph, for a couple of days, the Beautiful Mess around me.

These aren’t quality photographs.

They were all taken on my cell phone in the quick moments between “adventures”.

It’s a little glimpse into my everyday life…

Cars: Bedroom turned Parking lot / Race track

IMG_3338

Cheerios: The Inside of my purse

IMG_3381

Dishes: Put away by tiny fingers that can’t reach past the edge of the counterIMG_3383

Dirty Laundry: Where dirty laundry doesn’t belong

IMG_3388

Smudges & handprints: On every glass surface

Provides endless entertainment to those on the other side

As you press your nose against the glass and stick out your tongue

Piles of treasure: Stored in every corner of every room

IMG_3380

Standing Water: After every bath time, underwater exploration

IMG_3387

Thoughts and ideas: When you run out of room for the paper to contain them allIMG_3344

I look around my house sometimes and all I see is chaos and destruction.

But, if I can step back and look beyond that;

I can sometimes stumble upon a beautiful mess!

IMG_3173

Every good and perfect gift is from above, coming down from the Father of the heavenly lights…

James 1:17

If you’ve enjoyed this blog, I’d love to have you check out & become a fan of my Facebook page.

Click {HERE} to access Christal Gavin Photography

If you’ve read any of my blogs before, you know that I love meeting and working with other small business owners.

Last week I was contacted by an awesome woman named Lindsay. She is an artist, a blogger, a mother & a military spouse; that’s the short list!!

Her and her family are getting ready to PCS  (the military is moving them: Permanent Change of Station)

to Hawaii.

I’m very jealous and wondering if anyone will notice when I hide away in their luggage!

Lindsay wanted to do a Lifestyle Family Session. Both of her children were born here, in Louisiana, and she wanted them to have something to remember this place.

IMG_0032-2

A lifestyle session is an unique session. With a lifestyle session you’re not doing as many (or any) posed photos. I am simply documenting you (and/or your family) while you do, whatever it is, that you enjoy doing.

This type of session is especially good for families with young children. It takes the stress off of the parents feeling like they have to get the child(ren) to sit, stand, smile, etc.

It catches genuine happiness as everyone is simply enjoying the moment

Image

 I pretty much just followed the family around the park

IMG_0116

and caught some fun moments of them playing

IMG_0148

During our session I had to get at least one photo of the earrings Lindsay was wearing.

Why?

Because, she makes them and they’re gorgeous!

IMG_0191

I told you she was a small business owner. With her business, Lilly Maelene, Lindsay creates products that are original designs and are created to personally fit you or those that you love.

You can click {HERE} to view her website

Her blog, “From Business to Casual” focuses on the art of slowing down. She posts about Motherhood, Army Life, Health, Wellness and Information.

Click {HERE} to view

I’m so glad I had the privileged to meet this wonderful family before they head off to their next adventure. Perhaps our paths will cross again. But, until then I’ll send them off with Aloha!

If you’re interested in booking  lifestyle session of your own you can click {HERE} to visit my website

or click {HERE} to become a fan of my Facebook page. There you will see more of my work as well as be in the know when I have specials, giveaways and host casting calls.

Remember

Last month I did a 3 part series. The inside look of a Military Welcome Home Ceremony.  You can click {HERE} to view Part 1, Homecoming Ceremony: Setting the Stage.

It featured photos from several different homecoming ceremonies, all who were soldiers returning to the Patriot Brigade, 10th Mountain of Fort Polk, LA.

It’s normal in a military community for a large group of soldiers to return home within a matter of days or weeks of one another. They have big ceremonies & there are welcome home signs all around town. Everyone is excited & the base seems fuller again. People will comment in passing how great is it to have our troops home!

However, there is usually still a handful of soldiers, sometimes within that same unit, that are held behind for whatever reason. Their loved ones are happy for those who’ve returned safe. Yet, their hearts hurt a little; Longing for their own soldier to be back home safe & sound.

I was privileged to photograph one more ceremony. Very few knew it was even taking place. It wasn’t held in the big aviation hangers. There weren’t as many signs, people or cameras. The crowd was much smaller.

IMG_0020

But, there was just as much love & excitement coming from each spouse who was there waiting!

IMG_0003

I wanted to remind everyone who reads this, that somewhere, someone is still missing their soldier….

They need our continued prayers & support.

The following account is pretty similar to what we saw in the “typical” military homecoming.

While you’re waiting for the 10 minute count down you snap some shots with your friends

IMG_0012

These friends, more often than not, become family. Military spouses share a bond like no others. You go through  experiences together, while staying back on the home front, that few can relate to.

It wasn’t long before we heard the sound of the motorcycle entourage announcing the arrival of the bus.

IMG_0033

To the sound of applause & cheering the soldiers began filing off, one by one

IMG_0035

Until they stood shoulder to shoulder in formation

IMG_0061

You could hear the voice of a little girl calling out from her mothers’ arms, I’m here daddy! I see you daddy! Come and get me!!

The next few minutes of ceremony feel like a lifetime as you’re waiting, so close – yet unable to touch your soldier!

A prayer is said

Giving thanks for the safe return of these men & women in uniform

IMG_0063

IMG_0064

Then, the soldiers are at attention as the pledge is recited

IMG_0066

Everyone is on their feet showing the proper respect

IMG_0069

IMG_0070

IMG_0019

The company colors are uncased, signaling their return

IMG_0078

The ARMY song is sung

IMG_0090

A sign that the ceremony is coming to an end.

People begin to inch forward out of their seats,

unable to sit & wait any longer

IMG_0085

The word is given & they’re officially released

You can see the anticipation & excitement in their eyes as they head towards one another

blurred

IMG_0092

Once they’re in each others arms

It’s pure joy

IMG_0096

From that point on, it seems to be the same for so many of us,

with every smile

Combined1

with every kiss

IMG_0125

with every touch

IMG_0113

you begin to feel like

Maybe he never left

Everyone is back where they should be

IMG_0099

All is right with the world

Life goes on

If you liked this blog, please take a minute to visit & become a fan of my Facebook page

You can click {HERE} to access it

Beginning Photography Tips Part 3: Composition

You can go back & view my other 2 posts regarding Basic Camera Settings & Lighting.

Toady we’re going to cover composition.

Have you ever stopped to think about the difference between a snapshot & a photograph?

The difference between a photograph and a snapshots is that a photograph contains artistic elements and it has some dependency on your technical skills as a photographer. A snapshot is just a visual record of whatever is in front of the lens. Today cameras have automatic functions that help with the technical aspect. But, it’s up to you as the photographer to add your own style (or artistic element) to transition it from a snapshot to a photograph.

Snapshots are meaningful to the people who took them; Because of who or what is in the shot. It captures a person, place or event that is special to them, the photographer.

Photographs connect with a wider variety of audience. They engage people. Either because the image tells a story or it looks nicer artistically. It’s photographed in a way that connects you & makes you want to know more about what’s happening.

We’ve all seen the black & white photo of the sailor kissing the nurse. Until recently no one knew who the subjects were. Yet, millions of people were drawn to the photograph. That’s the difference between a snapshot & a photograph.

There are really no rules when it comes to photography; Being that photography is art.

However, there are certain things that will help to make a more artistically appealing image. The composition of an image can be key to distinguishing it from a snapshot & a photograph. We’re going to cover a few things under the umbrella of composition.

1. Have a Focal Point

Is your photo taken in a way that the subject is obvious?

Here we have a snapshot of a party table

1982310_10201153551112519_2004324_n

There’s a lot of things to distract us from the subject. (The subject being, the table draped in purple)

Now, by changing our position & focusing solely on the table in question we can get this

IMG_0224

We’ve created a focal point.

Another way to draw focus to the subject is to make your image black & white.

A black & white photos creates a more intimate looking shot. Sometimes it helps to draw the eye away from distractions & onto what the subject should be

IMG_0145-2

2. Keep Your Horizons, Horizontal

When you’re photographing, your hand will sometimes naturally tilt to one side. This can result in your subject remaining straight (or fairly straight) & your background being crooked

IMG_1192-2

The ocean should’t be slowly draining into the right side of my image.

Remember to keep your hand straight & steady so that your horizons remain horizontal.

IMG_1192

The exception to this “rule” is when you are artistically making your entire photo “off kilter”. When your subject, as well as your horizon are intentionally not centered, you can create an artistic & visually appealing photograph.

1167392_633024773407325_1725349308_o

(photo above courtesy of Sara Clance Photography)

3. The Rule of Thirds

The rule of thirds is based on the idea that peoples eyes are automatically drawn to certain points in a photo. Think of it like a tic-tac-to grid. If you place your subject in the intersecting points, it’s supposed to make for a more visually appealing photo. Look & see which one you’re drawn to first

IMG_0681

edited BD-6

The rule of thirds is not a must. It just encourages you to think outside the box. You don’t always have to have your subject in the center of the photo.

Some other things that too keep in mind are your viewpoints & angles.

If you have a child or pet or something low to the ground- photograph it at eye level.

550261_420692831317999_1344382811_n

You will see me in some strange and unflattering positions sometimes.

1487366_10152284617389378_1567502124_n

(Thanks for the behind the scenes photo, Jackie)

Shoot at eye level or above for more flattering poses. Especially on women.

 The same photo at different angels can make a nose or forehead look smaller or larger. Different angles will also give a  different style to the image.

IMG_0653

The same position shot from above

IMG_0669

Leave your subject in one spot & move around them to create different looks

Don’t be afraid to fill the frame. I especially love this style on children. Don’t be afraid to zoom in on your subject for a totally different look on a photo

IMG_0198

Finally, be aware of your overall position: Is anything “growing out of their head”, like a tree branch? We talked about shadows, in part 2, watch out for them.  Is there trash in the picture? These aren’t as big a deal for those snapshot style photos. But, if you’re looking for photograph quality – it’s in the details.

Hopefully these tips have helped you think twice about the way you take a picture. More important, I hope you are inspired to go try out some of the tips you’ve learned!

If you like what you’ve read, please click {HERE} and go like my Facebook page

If you have ideas for additional blog tips you’d like to see, just send me a message!